This is an old revision of the document!
Table of Contents
CAN interface raspberry pi
https://github.com/victronenergy/venus/wiki/RaspberryPi-CAN-Interfaces
mqtt cmds
- send the following with mqtt and all data is recived.
R/e45f01bd8b47/keepalive

example -
- change SSH settings
Topic: W/e45f01bd8b47/settings/0/Settings/System/SSHLocal
Payload: {"value": 0} (disable) {"value": 1} (enable)
N/e45f01bd8b47/system

["vebus/#", "solarcharger/+/Dc/0/Voltage"]
grid code victron
Are the off peak hours the same every day? if so, install the ESS assistant and look at scheduled charging. Alternatively set to 'keep batteries charged' and when grid /generator power becomes available it'll charge the batteries
Before you do that, put down your tools and spend a few hours working through Victron's free training program, it will save you countless extra hours of locking your system with passwords, setting it up incorrectly and posting on forums for advice, lol
https://www.victronenergy.com/information/training
grid password is TPWMBU2A4GCC (which is in the training docs!)
multipluss 2 remote switch
venus os energy save
block wifi bluetooth
victron ess setup
display
Venus OS page
raspberry pi install https://github.com/victronenergy/venus/wiki/raspberrypi-install-venus-image
Home assistant integration
- mosquitto config
➜  ~ cd /share/mosquitto
➜  mosquitto ls -la
➜  mosquitto cat victron.conf
connection victron
address 10.11.12.141:1883
topic N/# in 0 victron/
topic R/# out 0 victron/
topic W/# out 0 victron/

keepalive_interval 5
restart_timeout 5 10
cleansession false
remote_username **
remote_password **
- sensor config
/config/configuration.yaml
mqtt: !include mqtt-victron.yaml
mqtt-victron.yaml
sensor:
  # Solarcharger Voltage
  - name: "Solar Charger Voltage"
    device_class: voltage
    state_topic: "victron/N/e45f01bd8b47/solarcharger/288/Dc/0/Voltage"
    value_template: '{{ value_json.value|float(0)|round(1) }}'
    unit_of_measurement: "V"

  # PV Solarcharger Voltage
  - name: "PV Solar Charger Voltage"
    device_class: voltage
    state_topic: "victron/N/e45f01bd8b47/solarcharger/288/Pv/V"
    value_template: '{{ value_json.value|float(0)|round(1) }}'
    unit_of_measurement: "V"

  # PV Solarcharger Load Amp
  - name: "PV Solar Charger Load Amp"
    device_class: current
    state_topic: "victron/N/e45f01bd8b47/solarcharger/288/Load/I"
    value_template: '{{ value_json.value|float(0)|round(1) }}'
    unit_of_measurement: "A"

  # PV Battery Load Power
  - name: "PV Battery Load Power"
    device_class: power
    state_topic: "victron/N/e45f01bd8b47/system/0/Dc/Battery/Power"
    value_template: '{{ value_json.value|float(0)|round(1) }}'
    unit_of_measurement: "W"

  # PV System DC Power
  - name: "PV System DC Power"
    device_class: power
    state_topic: "victron/N/e45f01bd8b47/system/0/Dc/Pv/Power"
    value_template: '{{ value_json.value|float(0)|round(1) }}'
    unit_of_measurement: "W"
https://community.home-assistant.io/t/victron-venus-os-with-mqtt-sensors-switches-and-numbers/527931
Gist Home assistant integration
https://www.imval.tech/index.php/blog/victron-mqtt-server-bridging
https://gist.github.com/KidA001/dc5584db340cf3ad513f9415b20ed5fa
http://www.steves-internet-guide.com/mosquitto-bridge-configuration/
https://community.home-assistant.io/t/multiply-sensor-value-with-another-value/15476
# Victron Data in HomeAssistant I love HomeAssistant and I also love my Victron Equipment. I knew they provided data over ModBus and MQTT and a while back I was determined to pull the data into HomeAssistant. I live fully off-grid and it's extremely helpful to know what the state of my system is whereever I am. I also built many automations that help me optimize my available power. Below is a walk through on pulling in Victron data to HomeAssistant over MQTT.
## Pre-reqs These are needed before proceeding:
- HomeAssistant (Duh!) - Some type of [VenusOS](https://www.victronenergy.com/live/venus-os:large) Device, you'll need the IP and it should be set to a static IP - [SSH & Web Terminal](https://community.home-assistant.io/t/home-assistant-community-add-on-ssh-web-terminal/33820) HomeAssistant Add-On (Used for editing a mosquitto conf file) - FileEditor Add-On (Used to edit HomeAssistant config files and sensors) - A MQTT GUI, I use [MQTT Explorer](http://mqtt-explorer.com/) (Not needed, but helpful to ensure things are working)
Note: I use HomeAssistant & HA interchangibly.
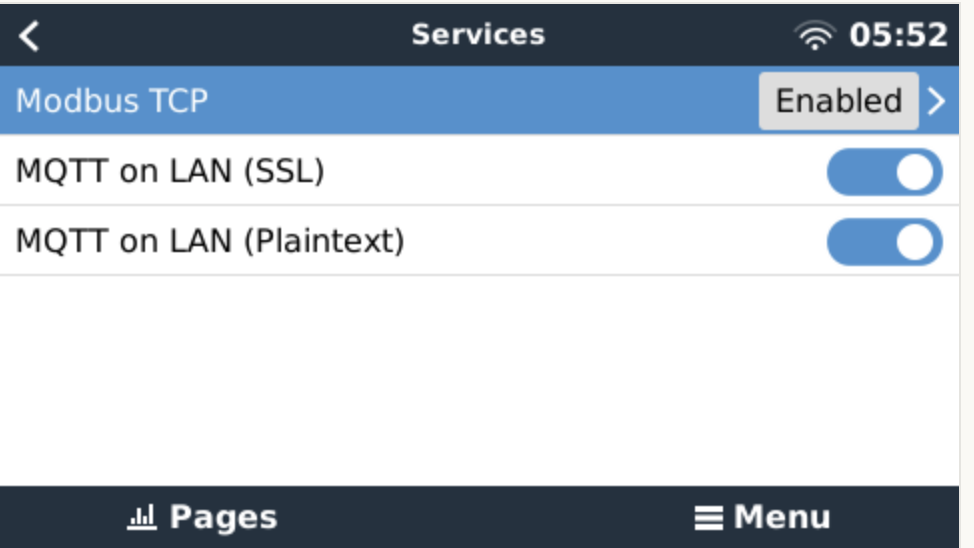
### Enable MQTT On your VenusOS Device Go to the IP address of your Venus device in your web browser. From there go to Settings > Services and enable Modbus, MQTT (SSL) and MQTT (Plaintext)
<img width=“487” alt=“image” src=“https://user-images.githubusercontent.com/8673088/189582614-cfd93be7-ad84-45c0-a0a9-e49805f6b821.png”>
### Setup Mosquitto MQTT Broker From your HomeAssistant instance go to Settings > Add-Ons and click the AddOn Store button and search for Mosquitto broker. Select it and install.
In the Configuration tab of Mosquitto go to the Customize section and ensure `active: true` and `folder: mosquitto` are set:
<img width=“306” alt=“image” src=“https://user-images.githubusercontent.com/8673088/189583761-19a565fb-bed3-4709-8102-b2940588b476.png”>
### Setup a bridge between your Victron MQTT and HomeAssistant/Mosquitto This allows all data from Victron to be mirrored on your HomeAssistant's Mosquitto Broker. This is the corret way to setup MQTT from Venus on HA instead of using the VenusOS device as a MQTT server.
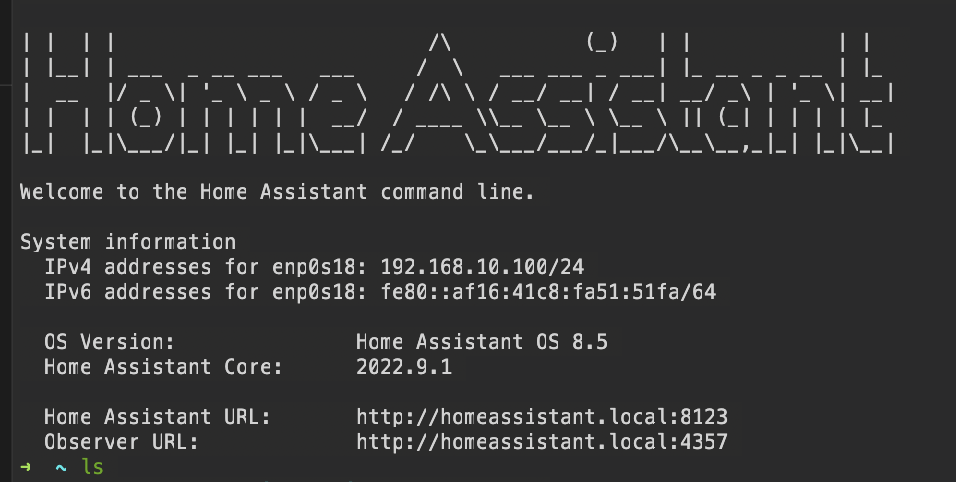
Open the Teriminal Web View in HomeAssistant, there should be a button in your Nav menu on the left if you already installed it into HomeAssitant. It should bring you to a HomeAssistant console like below:
<img width=“478” alt=“image” src=“https://user-images.githubusercontent.com/8673088/189584564-a9f55c9c-9770-47d7-b47c-837685f854f1.png”>
From there lets go into the mosquitto directory with: ```bash cd /share/mosquitto ```
Then lets create the file we'll use for victron config with: ```bash touch victron.conf ```
Now lets edit that file and add some config. Open in nano editor with ```bash nano victron.conf ```
Add the following config and replace `your.venus.ip.address` with your VenusOS IP Address: ```bash connection victron address your.venus.ip.address:1883 topic N/# in 0 victron/ topic R/# out 0 victron/ ```
Hit `cntrl + x` and then `y` and `enter` at the prompt to save. Go back to the Mosquitto Broker AddOn and restart the service.
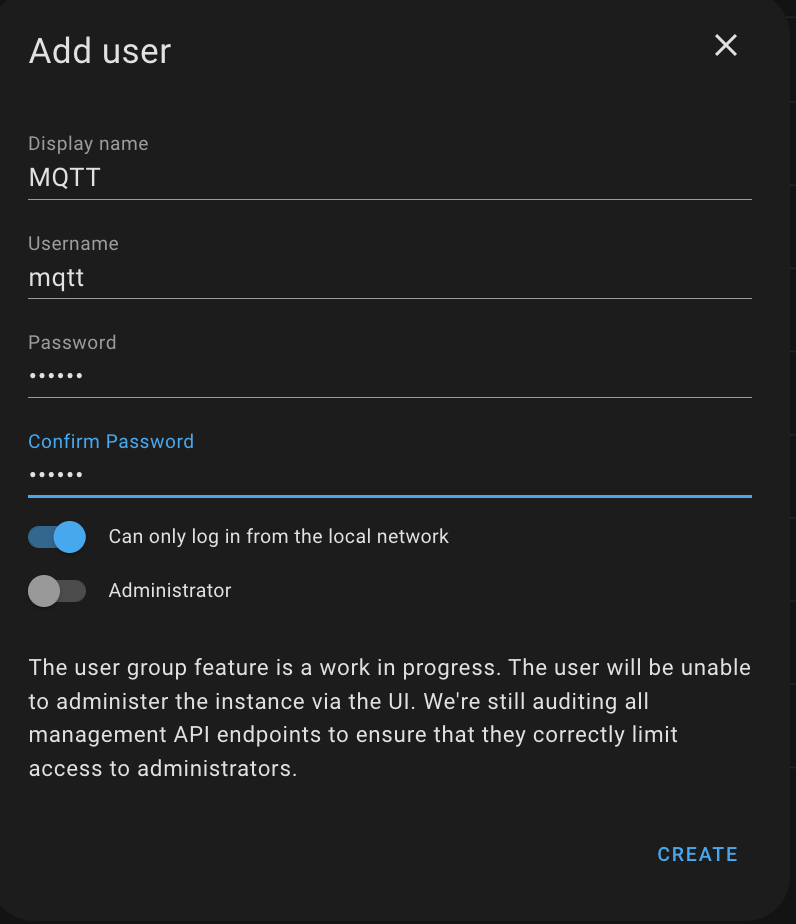
### Add a MQTT User in HomeAssistant In HA you need to create a User account that will be used to login to the MQTT Server you just setup. In HA go to Settings > People and select the Users tab at the top. Create a user with a username & password, note this for the next couple steps:
<img width=“398” alt=“image” src=“https://user-images.githubusercontent.com/8673088/189586778-d0d6e4e0-d906-41af-b1ba-738098f574cd.png”>
If you have issues on your network logging into your MQTT service try disabling `Can only log in from the local network`.
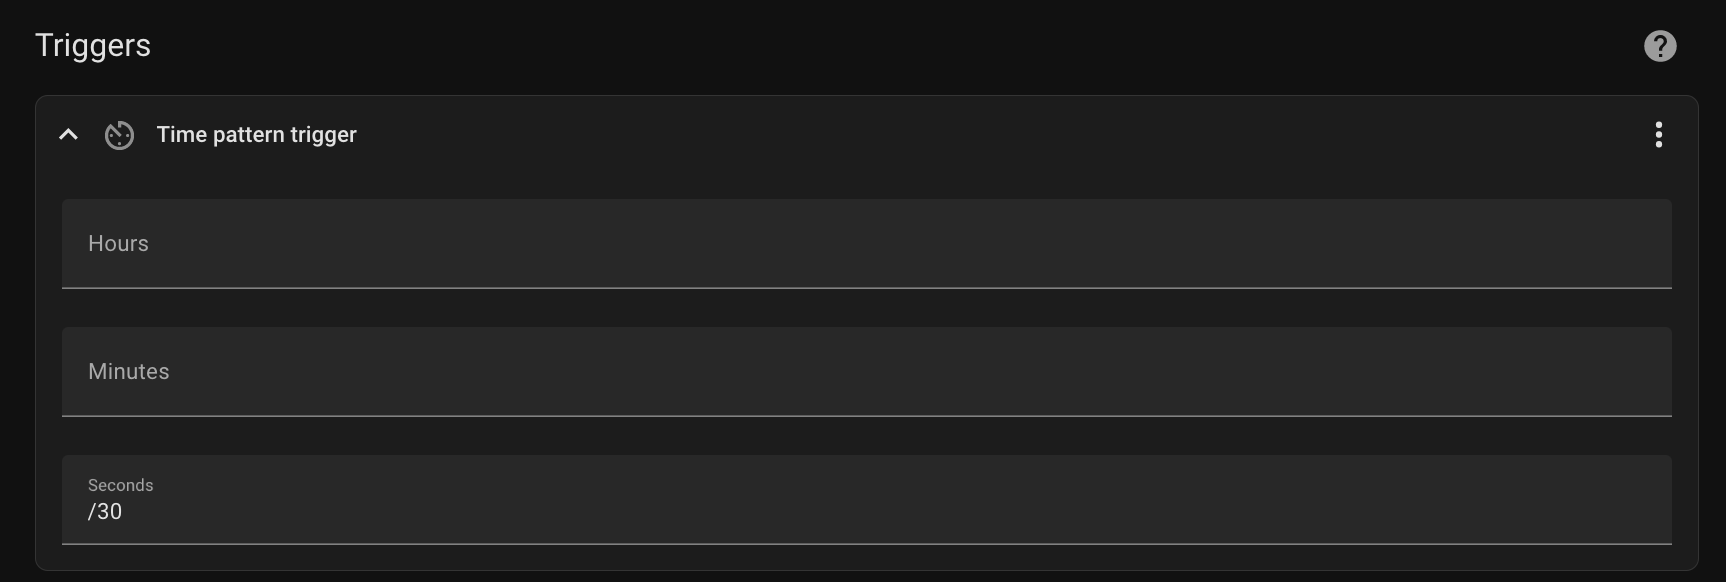
### Create a KeepAlive Automation The MQTT service on Victron needs to be _kept alive_. We do this by sending a keep-alive message every 30-seconds.
In HomeAssistant go to Settings > Automations & Scenes, create a new Automation called `Victron MQTT KeepAlive`. The `trigger` should be `Time Pattern` and set to every 30 seconds which is expressed as `/30`
<img width=“863” alt=“image” src=“https://user-images.githubusercontent.com/8673088/189698984-16f46f32-2d11-46da-858d-d52131b093e4.png”>
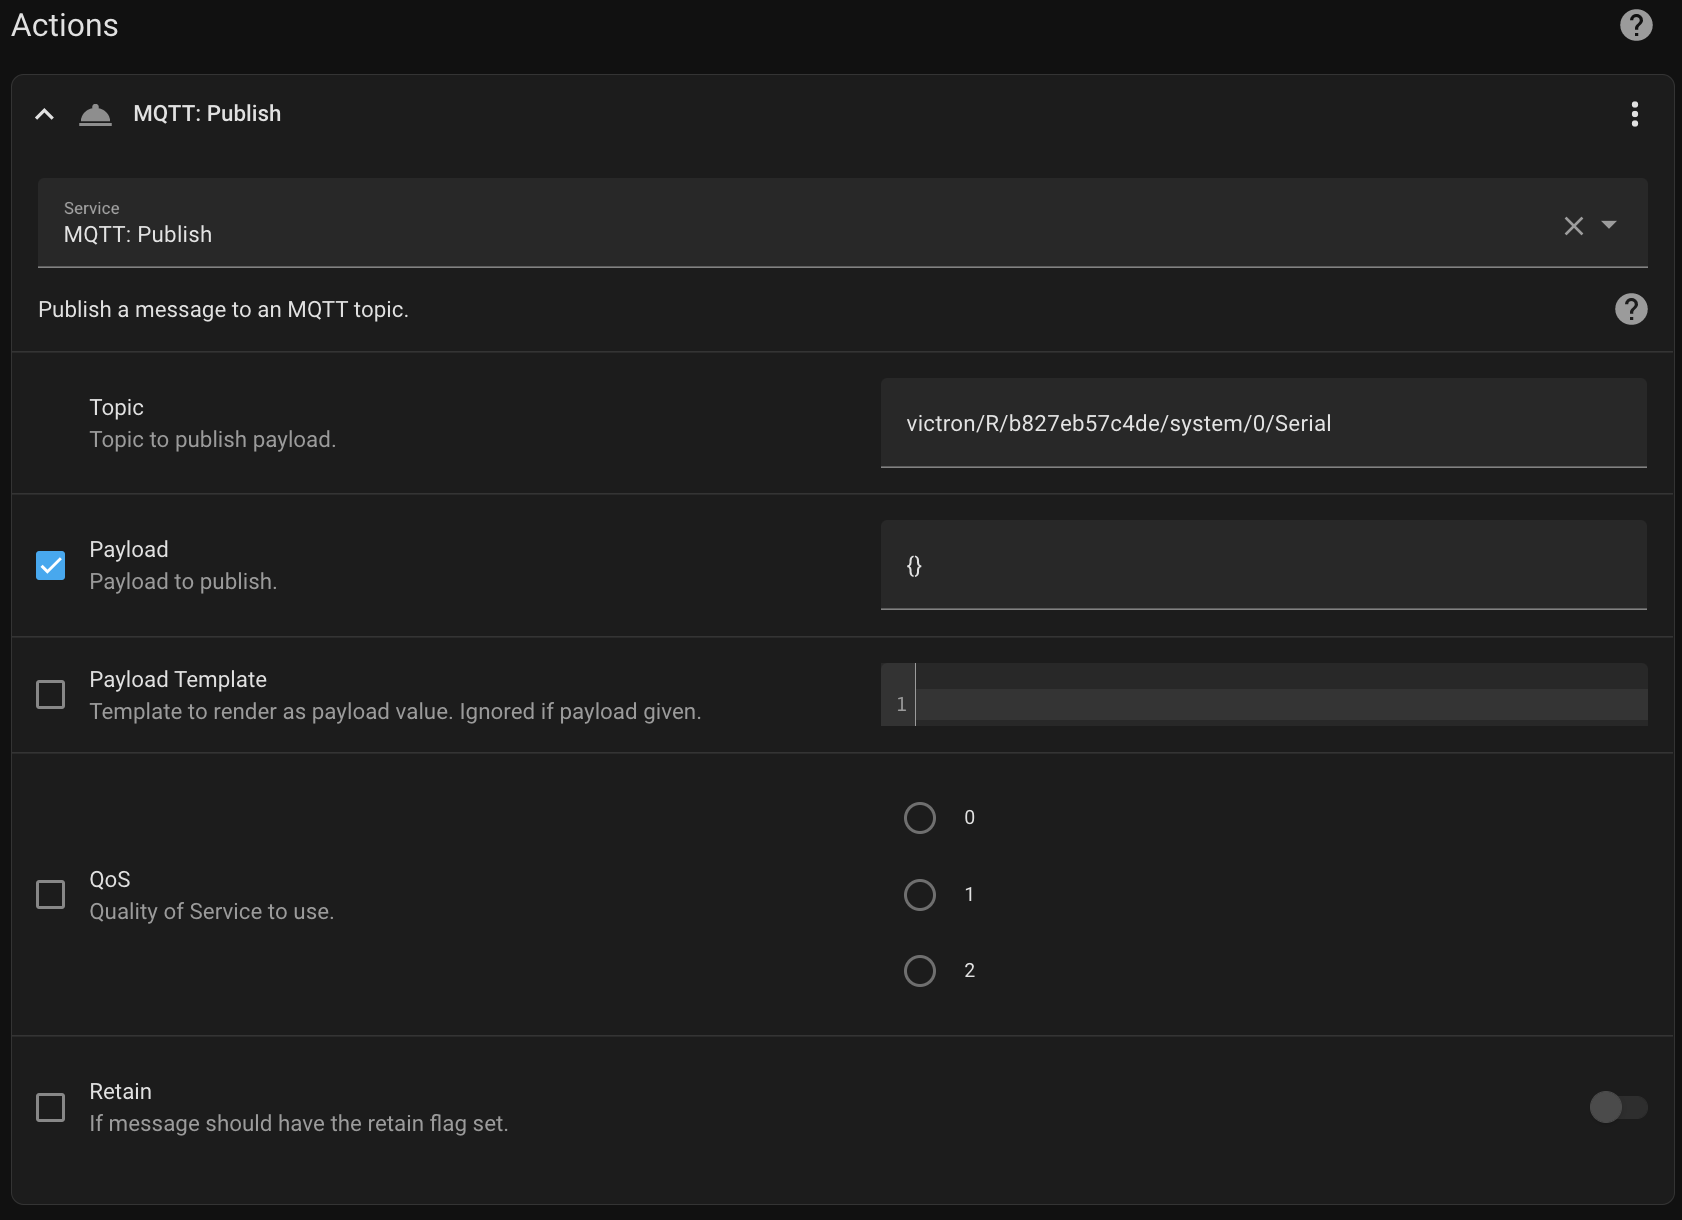
Then the action should be `Call Service` and select `MQTT: Publish`. The topic is `victron/R/your-venus-id/system/0/Serial`, payload: `{}`. Hit save and you're done.
<img width=“841” alt=“image” src=“https://user-images.githubusercontent.com/8673088/189698949-67692e75-71fa-47c6-b3ca-36d8beec7b7b.png”>
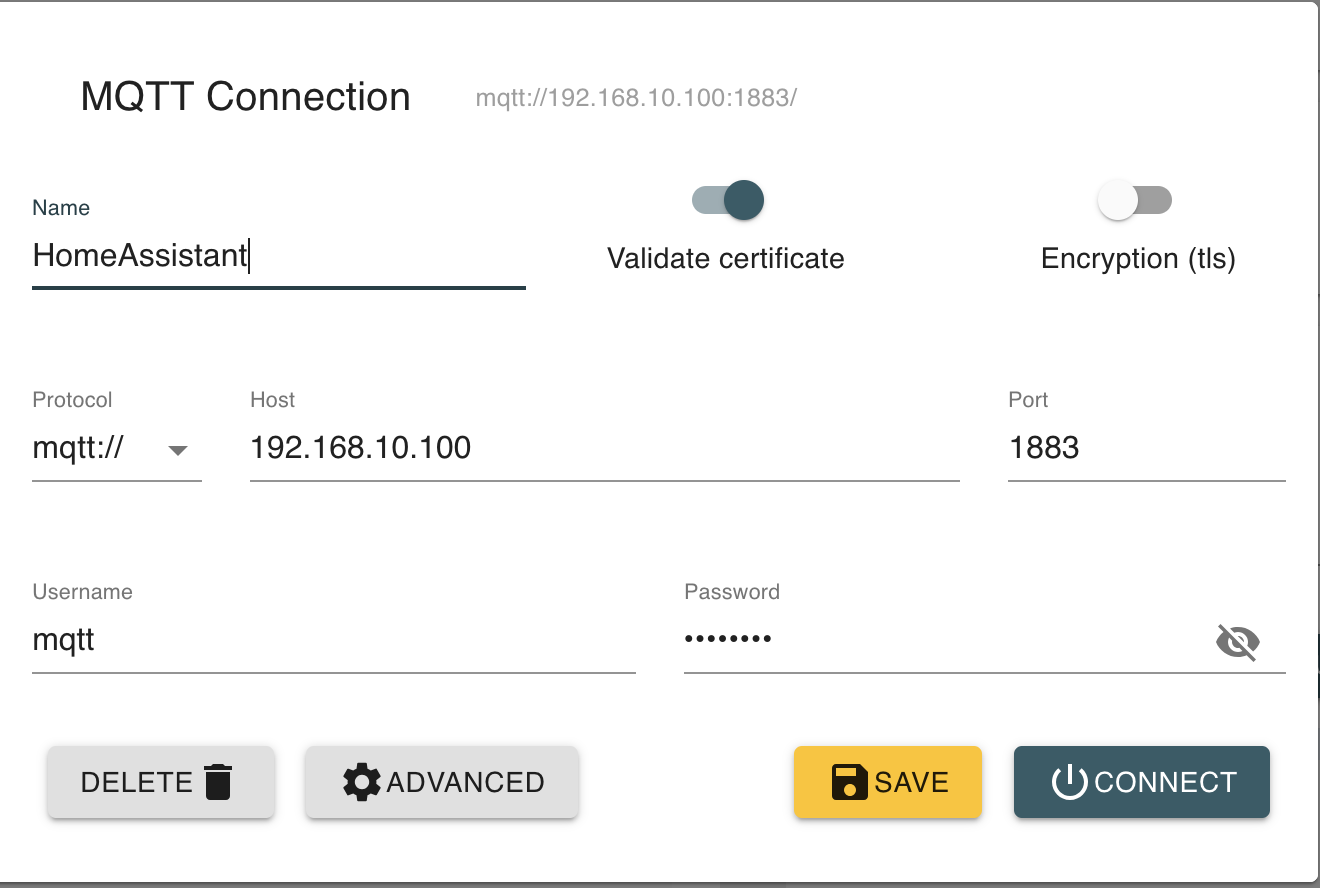
### Verify Mosquitto has Victron data! Open the MQTT GUI/Application (I use MQTT Explorer). For the Host provide the IP Address of your HomeAssistant. For User/Pass use the one you just created:
<img width=“660” alt=“image” src=“https://user-images.githubusercontent.com/8673088/189587440-919f9866-cc3e-424f-a990-a1422831a691.png”>
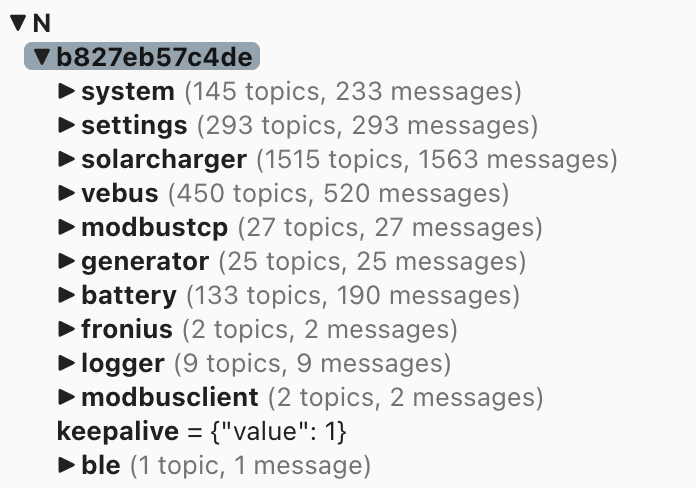
If everything is setup properly, you should start to see data from your Victron Equipment show up. It will be under the `victron/N` key. Make note of the ID beneath that, mine below is `b827eb5c4de`. This is the unique ID for your Victron System and you'll need to reference in your sensors later.
<img width=“348” alt=“image” src=“https://user-images.githubusercontent.com/8673088/189588469-a40bfe0e-0647-456b-a35e-c8f0cfcec79c.png”>
If this is working, you've done all the hard stuff!
### Add the MQTT Integration in HA This integration allows HA to use data from MQTT as sensors..etc. Go to Settings > Devices & Services and click Add Integration at the bottom. When prompted add the IP of your HomeAssistant instance, and the username/password of the mqtt user you created.
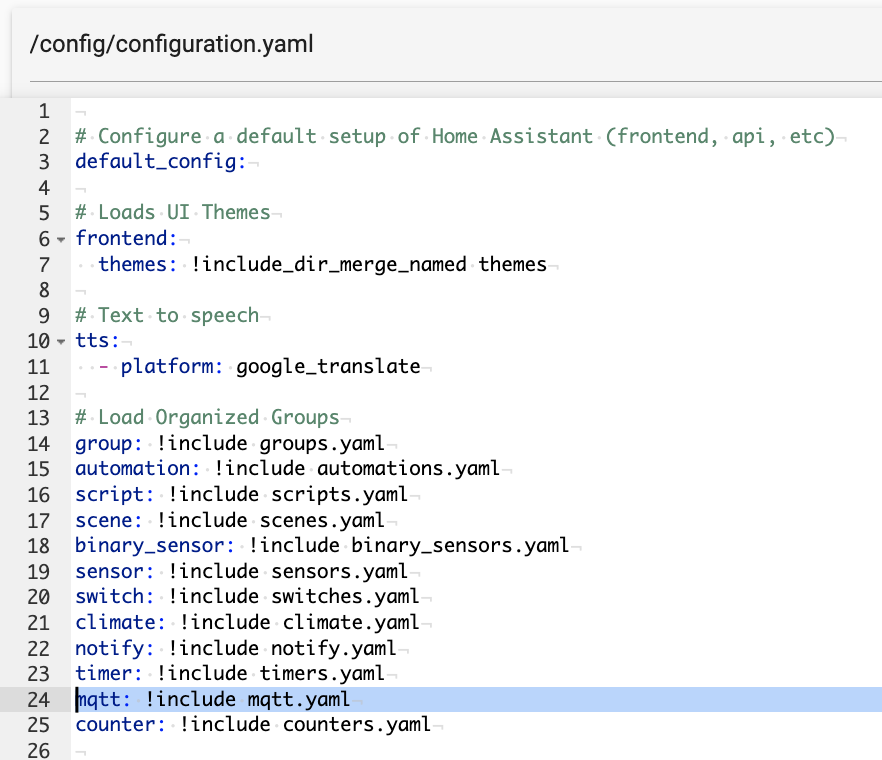
### Add Sensors to HomeAssistant (the fun part) You should now be able to start adding sensors in HomeAssistant that pull data from your VenusOS Device. Use the FileEditor in HomeAssistant, there should be a button in the left Navigation Pane if you've installed the AddOn. From there open the `configuration.yaml` file and add this line: ```yaml mqtt: !include mqtt.yaml ```
Mine looks like this:
<img width=“441” alt=“image” src=“https://user-images.githubusercontent.com/8673088/189592672-dee2d340-ea82-419f-821d-7ad0e3274205.png”>
Now create a new file in the `config` dir called `mqtt.yaml` to match. Do this by clicking the folder icon in the top left and then clicking the `New File` icon.
Once you're in that new file you can start adding sensors. Below are some sensors to get you started. Replace `your-venus-id` with the unique ID we noted above. Note that the exact paths for your system may be different than mine. Use the MQTT Explorer to find the data you might want
```yaml sensor:
# Battery percentage
- state_topic: "victron/N/your-venus-id/system/0/Batteries"
  name: "Battery Percent"
  device_class: battery
  value_template: '{{ value_json.value[0].soc | round(0) }}'
  unit_of_measurement: "%"

# AC Loads
- state_topic: "victron/N/your-venus-id/system/0/Ac/Consumption/L1/Power"
  name: "AC Loads"
  device_class: power
  value_template: '{{ value_json.value }}'
  unit_of_measurement: "W"
  icon: mdi:power-socket-uk

# DC Loads
- name: "DC Loads"
  device_class: power
  state_topic: "victron/N/your-venus-id/system/0/Dc/System/Power"
  value_template: '{{ value_json.value|float(0)|round(0) }}'
  unit_of_measurement: "W"
  icon: mdi:power

# Net Solar Production
- name: "Current Solar Production"
  device_class: power
  state_topic: "victron/N/your-venus-id/system/0/Dc/Pv/Power"
  value_template: '{{ value_json.value|float(0)|round(0) }}'
  unit_of_measurement: "W"
  icon: mdi:solar-power

# Battery Voltage
- name: "Battery Voltage"
  device_class: voltage
  state_topic: "victron/N/your-venus-id/system/0/Dc/Battery/Voltage"
  value_template: '{{ value_json.value|float(0)|round(1) }}'
  unit_of_measurement: "V"
# Battery Temp (If you have a temp sensor)
- name: "Battery Temp"
  device_class: temperature
  state_topic: "victron/N/your-venus-id/system/0/Dc/Battery/Temperature"
  value_template: '{{ ((value_json.value * 9/5) + 32) | round(0) }}'
  unit_of_measurement: "°F"
# Net load going in/out of your battery
- name: "Battery Load"
  device_class: power
  state_topic: "victron/N/your-venus-id/system/0/Batteries"
  value_template: '{{ value_json.value[0].power|float(0)|round(0) }}'
  unit_of_measurement: "W"

# Current State of your Inverter
- name: "Inverter State"
  state_topic: "victron/N/your-venus-id/system/0/SystemState/State"
  value_template: >
    {% if value_json.value == 0 %}
      Off
    {% elif value_json.value == 2 %}
      VE.Bus Fault condition
    {% elif value_json.value == 3 %}
      Bulk
    {% elif value_json.value == 4 %}
      Absorption
    {% elif value_json.value == 5 %}
      Float
    {% elif value_json.value == 6 %}
      Storage
    {% elif value_json.value == 7 %}
      Equalize
    {% elif value_json.value == 9 %}
      Inverting
    {% elif value_json.value == 10 %}
      Assisting
    {% elif value_json.value == 256 %}
      Discharging
    {% elif value_json.value == 257 %}
      Sustain
    {% else %}
      Error - No Data
    {% endif %}

# Current state of your charge controller
- name: "Solar Charger State"
  state_topic: "victron/N/your-venus-id/solarcharger/289/State"
  value_template: >
    {% if value_json.value == 0 %}
      Off
    {% elif value_json.value == 2 %}
      Fault
    {% elif value_json.value == 3 %}
      Bulk
    {% elif value_json.value == 4 %}
      Absorption
    {% elif value_json.value == 5 %}
      Float
    {% elif value_json.value == 6 %}
      Storage
    {% elif value_json.value == 7 %}
      Equalize
    {% else %}
      Error - No Data
    {% endif %}
# Estimated Time until battery is empty based on current load.
# These calculations were copied from victrons code to mimic how they display it
- name: "Battery Remaining"
  icon: mdi:timer-sand
  state_topic: "victron/N/your-venus-id/system/0/Dc/Battery/TimeToGo"
  value_template: >
    {% if value == '{"value": null}' %}
      ∞
    {% else %}
      {% set seconds = value_json.value | round(0) | int %}
      {% set days = (seconds / 86400) | round(0, 'floor') | int %}
      {% set hours = ((seconds - days * 86400) / 3600) | round(0, 'floor') | int %}
      {% set minutes = ((seconds - hours * 3600) / 60) | round(0, 'floor') | int %}
      {% if 2 > days >= 1 %}
        {{days}} Day
      {% elif days >= 2 %}
        {{days}} Days
      {% elif hours > 0 %}
        {{hours}} Hours
      {% elif minutes > 0 %}
        {{minutes}} Minutes
      {% else %}
        ∞
      {% endif %}
    {% endif %}
```
Restart your HA for the sensors to be loaded.
### Add Sensors to your Dashboard You can now add sensors to your Dashboards! Even better are to start writing automations based on your power. How you organize them is up to you, if you're intersted in my exact layout let me know and I can share more
<img width=“659” alt=“image” src=“https://user-images.githubusercontent.com/8673088/189593193-7992f51c-3b3c-430d-acec-8e7aa159c5bd.png”>
I hope this tutorial was helpful, and enjoy!